Best ND Filters for Drone Videography: Top Brands & How to Use Them

September 25, 2025
Have you ever watched your drone footage and felt like something was… off? Maybe it looked too sharp, too jittery, or just didn’t have that smooth, cinematic motion you see in professional aerial videos.
The problem usually isn’t your drone. It’s your shutter speed, and that’s exactly where ND filters come in.
Think of ND filters like sunglasses for your drone’s camera. They reduce brightness, help you control exposure, and lock in the right shutter speed. This gives your video that natural motion blur that looks professional and cinematic.
This guide isn’t about general ND filters or photography tips. It’s made for drone videographers.
Whether you’re flying a DJI Mini 4 Pro, Mavic 3, or anything in between, you’ll learn which ND filters to use for better video quality and how to choose the right ones based on lighting and frame rate.
If you’re tired of getting “okay” drone footage and want to level up to cinematic video, you’re in the right place.
Let’s get started.
If you want your drone videos to look cinematic, follow the 180-degree shutter rule.
This means your shutter speed should be about twice your frame rate. So if you’re shooting at 24fps, aim for a shutter speed of 1/50.
But in bright outdoor conditions, your camera will often overexpose the image at those slower shutter speeds. That’s where ND filters play a major role.
By reducing the amount of light hitting the sensor, ND filters let you stick to the correct shutter speed without blowing out your highlights.
The result is more natural motion blur and smoother footage, especially during pans, tilts, or fast movement.
What do you need to consider when buying ND Filters? Let’s explore that next.
Before buying ND filters for your drone, it’s important to understand how they actually affect your video footage.
The right filters help you capture smoother, more cinematic shots. The wrong ones can introduce unwanted issues such as color distortion, flickering, or overexposure.
Here are the key considerations:
The first thing to understand is the difference between fixed ND filters and variable ND filters.
Fixed ND filters are available in set strengths like ND8, ND16, or ND32. These are the most reliable for drone videography. They offer consistent results and maintain image quality.
Variable ND filters, on the other hand, let you adjust the light reduction by rotating the filter. This is great for handheld cameras, but not for drones.
Most drone lenses are wide-angle, and variable filters can cause issues like vignetting or uneven exposure.
That’s why most professionals stick to fixed NDs when flying drones.
As you explore drone filters, you’ll likely find two main types: standard ND filters and ND/PL filters.
Both serve different purposes in drone videography, and choosing the right one depends on what and where you’re filming.
ND filters (Neutral Density) are used to control exposure by reducing the amount of light hitting the sensor.
Their main job is to let you maintain a slower shutter speed for proper motion blur, especially in bright conditions.
They’re simple, effective, and require no adjustment once mounted. These are ideal for general-purpose shooting in changing light or fast-paced environments.
ND/PL filters are hybrid filters that combine ND functionality with a polarizing element.
Along with reducing light, they also reduce glare and reflections from surfaces like water, glass, snow, or wet roads.
Polarization enhances contrast and color saturation, which can dramatically improve the look of reflective scenes.
However, there’s a trade-off.
To get the polarizing effect just right, ND/PL filters must be rotated to a specific angle before takeoff. This can be tricky because once the drone is in the air, you can’t adjust the angle.
Because of this limitation, ND/PL filters work best when you’re filming in a consistent direction.
For example, if you’re tracking a subject across a lake or flying over water, you can set the angle beforehand and get great results.
But they’re less ideal when lighting and angles change frequently, or when you’re flying spontaneously without time to prepare.
So, standard ND filters are a reliable choice when you need to move quickly without sacrificing exposure control.
Next, you need to choose the right filter strength based on the lighting conditions.
For cloudy or low-light days, ND4 usually works best.
If you’re filming during golden hour or on an overcast afternoon, ND8 is a good option.
On a bright sunny day, ND16 gives you a balanced exposure while keeping your shutter speed in check.
For very bright conditions like beaches, snow, or direct midday sun, you may need ND32 or even ND64.
This is why most videographers use a small kit that includes several filter options to switch between as needed.
Make sure the filters you buy are compatible with your specific drone.
Different drones have different lens sizes and mounting systems.
Filters designed for the DJI Mini 4 Pro won’t fit a Mavic 3. Also, not all gimbals can handle heavy or poorly balanced filters.
Always choose filters that are made for your drone model to avoid issues during flight.
Lastly, build quality matters more than you might think.
High-quality filters use multi-coated optical glass. These produce clearer images and maintain true color.
Cheaper filters can introduce unwanted color shifts or reduce sharpness.
Look for lightweight but durable frames, usually made from aluminum. This ensures they won’t interfere with your drone’s gimbal.
Finally, instead of buying individual filters, it’s usually better to go for a complete kit.
A well-rounded kit like an ND8/16/32/64 set gives you flexibility across different lighting conditions. It’s more cost-effective and saves you the guesswork when you’re out in the field.
Let’s explore the best ND Filter brands available in the market.
There are a lot of ND filter brands on the market. However, not all of them are built with drone videography in mind.
Some are designed for general photography or handheld cameras and don’t perform well in aerial shooting conditions.
Below are four trusted brands that offer reliable ND filters made specifically for drones. These are well-known in the drone community and tested by videographers around the world.

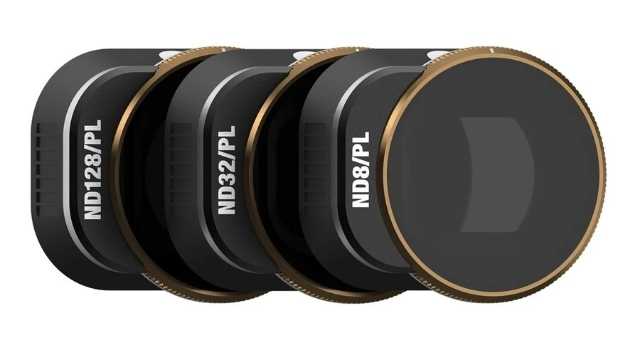
Credit: Freewell
Freewell is one of the most popular choices among drone pilots. Their filters are well-built and offer solid optical performance at a reasonable price.
Most kits include both standard ND filters and ND/PL (polarized) versions. This gives you options for different lighting and shooting conditions.
The filters are lightweight and work well with DJI drones, including the Mini, Air, and Mavic series.
Pros:
Cons:
Credit: PolarPro
PolarPro is a premium brand aimed at serious drone videographers. Their filters are built with cinema-grade glass and high-end coatings.
This results in sharp, clean footage with minimal color distortion.
They are more expensive than most brands, but many professionals consider them worth the cost.
The Vivid Collection, which includes ND/PL filters, is especially popular for its cinematic look.
Pros:
Cons:
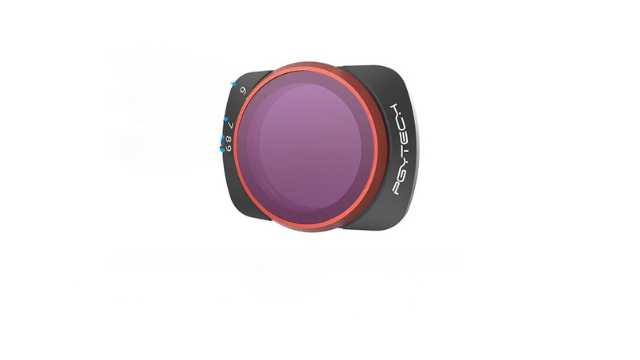
Credit: PGYTECH
PGYTECH is a solid choice for drone pilots on a budget. Their ND filters are affordable but still perform well enough for casual and semi-professional use.
They may not be as sharp as PolarPro or Freewell in all situations, but for most users, the difference is minimal.
They are lightweight, easy to install, and come with simple storage cases.
Pros:
Cons:
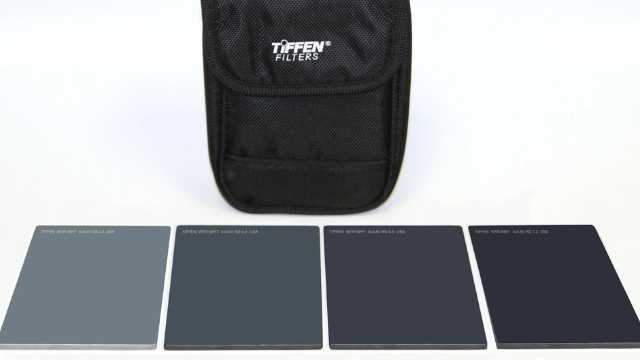
Credit: Tiffen
Tiffen is a well-known name in the film and broadcast industry. Their camera filters are used on Hollywood sets and professional productions worldwide.
They also make ND filters for drones, though the range is limited.
If your drone is supported, you’ll get excellent glass and professional-level results.
Pros:
Cons:
Always buy filters that are made for your specific drone.
Even the best filters won’t help if they don’t fit properly or throw off your gimbal balance. A snug, lightweight, and model-specific filter will always give you better results.
ND filters can transform your drone footage, making it smooth, cinematic, and professional-looking.
However, achieving the best results requires knowing exactly how to use these filters in real-world shooting situations.
Here’s a step-by-step approach to help you master them.
The first step is to set your drone’s camera to manual video mode. This might be labeled as Pro mode or M mode, depending on your drone model.
Manual mode lets you control important settings like shutter speed and ISO yourself. This control is essential because automatic modes tend to pick very fast shutter speeds when shooting in bright conditions.
By switching to manual mode, you take full charge and prevent the drone from changing these settings mid-flight, which can lead to inconsistent results.
Next, set your shutter speed to roughly double your chosen frame rate; this is known as the 180-degree shutter rule.
For example, if you’re shooting at 24 frames per second (fps), aim for a shutter speed around 1/50th of a second.
If you shoot at 30fps, use 1/60th of a second, and for 60fps, set your shutter speed to about 1/120th of a second.
This rule creates the natural motion blur that our eyes are used to seeing in film and video, giving your drone footage a smooth and cinematic look.
Before you take off, it’s crucial to do a quick exposure test with your chosen ND filter attached.
Look at your drone’s live video feed on the remote controller or your connected device.
If your drone supports it, turn on exposure tools like the histogram or zebra stripes. It helps you spot areas that might be overexposed or properly balanced.
If the image still looks too bright, swap in a stronger ND filter and check again.
Instead of adjusting your shutter or ISO to fix the exposure, use the filter to control the light coming into the lens. Think of the ND as a way to protect your cinematic settings, not as a fix for bad exposure.
Performing this simple step on the ground ensures you’re not wasting precious flight time capturing unusable footage due to improper exposure.
If you’re using ND filters with a polarizing element, adjust the polarizing angle manually before takeoff.
These filters can reduce glare from water, roads, or glass and enhance contrast, but only if they’re set correctly.
Rotate the filter while watching the live feed, and stop when you see the reflections drop or the colors become richer.
Once the drone is in the air, that angle is locked, so get it right on the ground.
Using ND filters correctly is a simple step that dramatically improves your drone videos. You’ll get smooth motion blur, balanced exposure, and cinematic quality that stands out.
Mastering ND filters is a creative decision that separates average drone footage from truly cinematic work.
When you understand how to use these filters with intention, you gain control over motion, light, and visual tone for your video.
As with any aspect of drone filmmaking, consistency comes from process.
The more familiar you become with ND filters, the more naturally they’ll become part of your pre-flight setup.
And once they’re second nature, you’ll start noticing a real difference: smoother footage, more cinematic motion, and far fewer surprises when you get to the editing stage.
If you want to take a deeper dive into drone videography, check out these comprehensive drone courses.